Converting a Static HTML Site into a WordPress Theme- Part 1
CSS Fixes- Header and Everything Else
- Time to work on the header. Type the following below the #header h1 style rule:
-
#header h1 a:visited, #header h1 a:link { color: #FFFFFF; text-decoration: none; } #header p { color: #FFFFFF; font-family: Georgia, "Times New Roman", "Nimbus Roman No9 L"/*Linux*/, serif; font-style: italic; margin-top: -6px; } - We can now work on the main part of the page, the content area and its associated posts. In style.css, type the following under classes and ids to style the entry-title class:
-
.entry-title a:visited, .entry-title a:link {
color: #FF7400;
text-decoration: none;
}

.entry-title a:active, .entry-title a:hover {
text-decoration: underline;
}
Next, style the post time and date info:
-
.postdata {
color: #00BBBB;
margin: -6px 0 6px 0;
}
Let’s add 20 pixels between each post:
-
.post { padding-bottom: 20px; } - Now, we can style the navigation link at the top, general post links and the welcome text when you login to the Admin panel. At the bottom of the style sheet, type:
-
.navigation {
font: bold 12px Georgia, "Times New Roman", "Nimbus Roman No9 L"/*Linux*/, serif;
padding-bottom: 20px;
}

.navigation a:visited, .navigation a:link {
color: #FF7400;
text-decoration: none;
}

.navigation a:active, .navigation a:hover {
text-decoration: underline;
}
To style all of our links, type the following after the final h6 tag as shown in bold:
-
h6 {
font-size: 8px;
}

/* link styles */
a:visited, a:link {
color: #FF7400;
}

a:active, a:hover {
color: #BF7130;
}
For the login message, type in:
-
.login-message { color: #FFFFFF; } - The next section to style is the search box in sidebar 2. Type this below the sidebar 2 rule:
-
#sidebar-2 #searchform input#s { border-top: 1px solid #666666; border-left: 1px solid #666666; border-bottom: 1px solid #EEEEEE; border-right: 1px solid #EEEEEE; color: #666666; background-color: #CCCCCC; margin-right: 6px; } - Finally, we must style the footer, then this part of the tutorial will be over. Type the following under the #footer style rule:
-
#footer p {
font-family: Georgia, "Times New Roman", "Nimbus Roman No9 L"/*Linux*/, serif;
color: #FFFFFF;
}

#footer a:visited, #footer a:link {
color: #FFFFFF;
}
Then under classes and ids, type this for our author link:
-
.author-link { font-size: 10px; } - One more thing to do is to format the style sheet so proper information shows up in the Admin panel. We need to add a proper title, description and so forth. At the very top of the style sheet, add these special comment tags:
-
/*
* Theme Name: Blue Green Blast
* Description: Blue Green Blast is an attractive theme that uses a complimentary
blue-green and red-orange color scheme. It features two widget-friendly sidebars,
a custom login section and a custom searchbox.
* Author: Jason Gonzalez
* Author URI: http://www.jgpws.com/portfolio
* Tags: two-column, right-sidebar, blue-green, simple
* Version: 0.1
*/
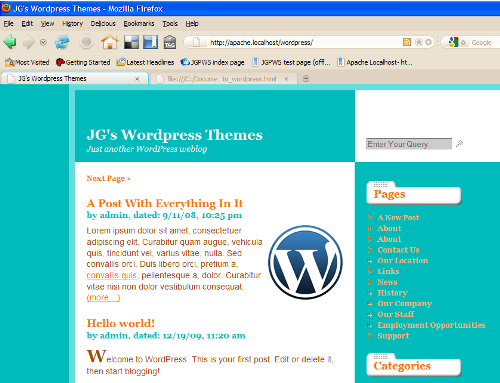
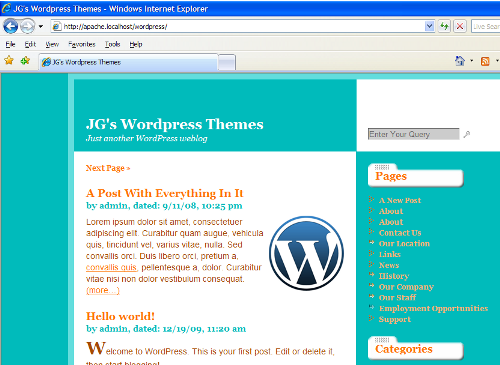
Screenshots of the front page’s design in Firefox and IE7 are below:
By now, this can be considered a fully functioning website, but it still isn’t a fully functioning blog. Blogs need the ability for readers to post and view comments, and WordPress blogs have special requirements for posts, pages and single page. So, if you are looking to create a design built on top of a content management system, you can stop reading here. But, to make our design blog specific, we will do that in our next and final tutorial: Converting a Static HTML Site into a WordPress Theme- Part 2.
Resources
WordPress Installation resources:
- Installing WordPress
- WAMP Server
- XAMPP for Windows
- MAMP
- XAMPP for Mac OSX
- HOWTO: Installing and Running WordPress on Ubuntu GNU/Linux ~ Moving to Freedom
- Install WordPress Locally 1 Of 2 « Weblog Tools Collection
- How to Install WordPress on Windows
Other Tutorials:
- So you want to create WordPress themes huh?
- So You Want To Create WordPress Themes Huh?- The Remix
- Creating a WordPress Theme- Part 1
- Getting Text in your WordPress Search Box
WordPress Codex pages:
- WordPress Codex
- The WordPress Loop
- Template Tags
- Function Reference
- Function Reference/wp login url: http://codex.wordpress.org/Function_Reference/wp_login_url
- Function Reference/get search form: http://codex.wordpress.org/Function_Reference/get_search_form
- Widgetizing Themes http://codex.wordpress.org/Widgetizing_Themes
Sample Content:
Trackbacks and Pingbacks
Trackback URL for this post: https://www.jasong-designs.com/2013/06/16/converting-a-static-html-site-into-a-wordpress-theme-part-1/trackback/


[…] Creating a Fancy Website Layout in Gimp 2.6, How To Slice Up Graphics for XHTML and CSS and Converting a Static HTML Site into a WordPress Theme- Part 1. In the last tutorial, we left off with a website that can be ran from the WordPress content […]